As contractors, we see a lot of leaking showers — but every now and then, a project stands out because of how quietly the damage developed behind the scenes. That was exactly the case in this Richmond Hill home.
The homeowner first called us because of a musty smell and a few cracked grout lines. Nothing dramatic. Nothing that screamed “major leak.” But after years working on older bathrooms across Richmond Hill and surrounding areas, we’ve learned that small signs like these often point to hidden moisture problems behind the tile.
And in this case, they did.
What started as a simple inspection quickly turned into a full shower rebuild after we uncovered long-term water damage hidden behind the walls. In this case study, we’ll walk through what the homeowner noticed, what we found during demolition, why the original waterproofing failed, how we rebuilt the shower properly, the materials we used, and how homeowners can help prevent leaks like this in the future.
Projects like this are fairly common in older homes where the original shower system was built before many of today’s waterproofing standards became common practice.
Signs Something Was Wrong
Before we even touched a tool, the homeowner described several issues that immediately raised red flags:
- Cracked grout in the shower corners
- Loose floor tiles near the shower entrance
- A damp, musty smell after every shower
- Paint bubbling near the baseboards
- Soft drywall beside the shower enclosure
Individually, these problems might not seem serious. But together, they almost always point to moisture finding its way behind the shower walls.
One of the biggest problems with hidden water damage is that it develops slowly. In many bathrooms, leaks continue quietly behind the tile for months or even years before homeowners notice visible symptoms.
What We Found Behind the Shower Wall
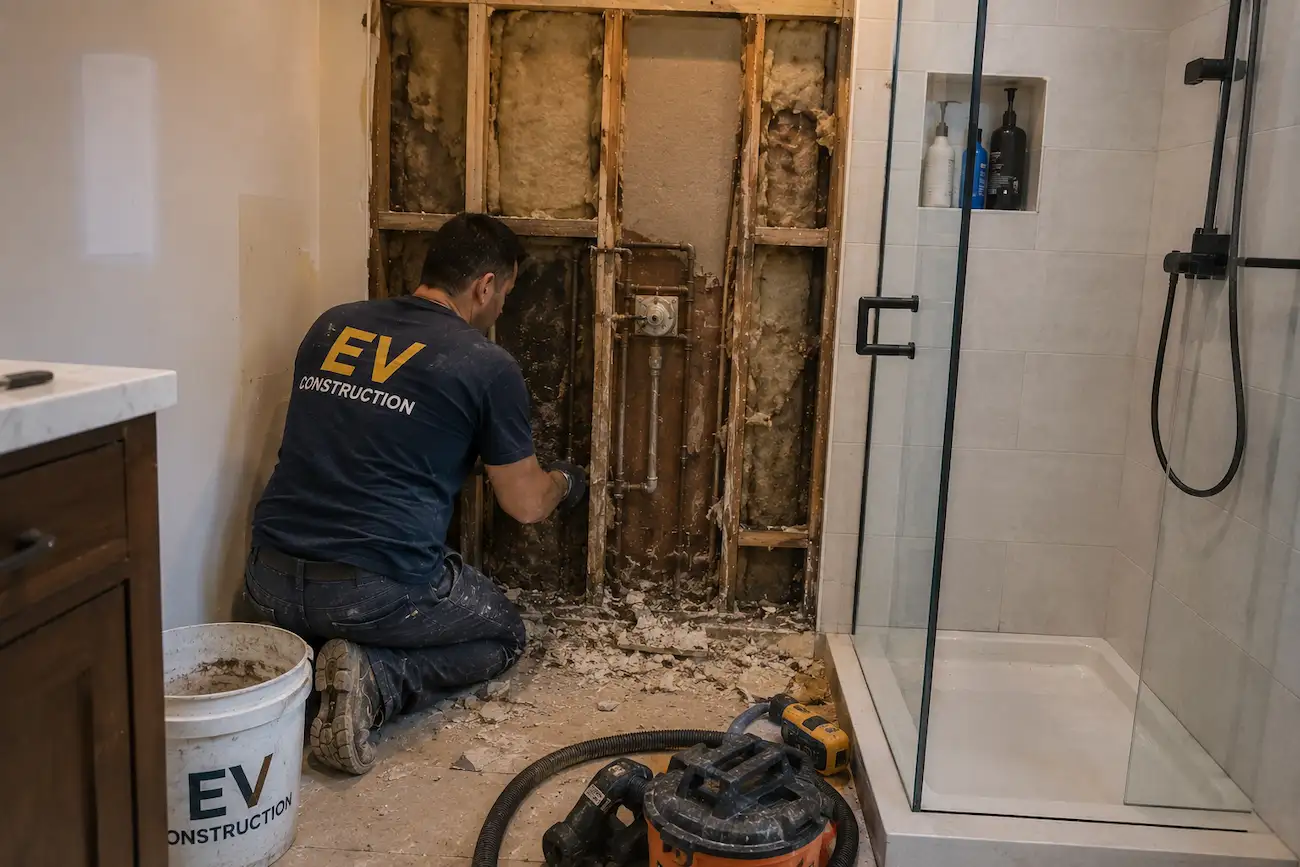
Once we began the controlled demolition, the story became clear.
Behind the tile, we found:
- Moisture trapped between layers of drywall
- Soft, crumbling backer material
- Darkened, moisture-stained framing
- Damp insulation near the lower corners
- Signs of long-term water exposure
This wasn’t a sudden plumbing failure. It was a slow leak caused by an improperly protected shower system that had gradually allowed moisture to move behind the tile over time.
After removing the damaged materials, we identified several problems with the original installation:
- No waterproof membrane behind the tile
- Poor sealing around plumbing fixtures
- Weak waterproofing near the shower curb
- Gaps around inside corners
- Incorrect slope directing water away from the drain
These are some of the most common issues we encounter during older shower rebuilds.
Why Shower Waterproofing Often Fails
One thing many homeowners don’t realize is that tile and grout alone are not fully waterproof. If moisture gets past the surface layer and there is no proper protection underneath, water can slowly spread behind the walls and flooring.
Some of the most common causes of shower leaks include:
Poor Installation
Shortcuts during installation often create long-term problems that stay hidden until visible damage appears.
Wrong Materials
Using regular drywall or low-quality sealants inside wet areas significantly increases the risk of future moisture damage.
Incorrect Shower Slope
If the shower base does not direct water properly toward the drain, moisture can collect in areas where it shouldn’t.
Movement Around Corners and Joints
Homes naturally shift over time. Without flexible waterproofing protection, small cracks can eventually form around corners and seams.
Aging Caulking and Grout
Even well-built showers require maintenance over the years as grout and sealants gradually wear down.
For homeowners interested in learning more about how modern waterproofing systems work, our guide on proper shower waterproofing methods explains the process in greater detail.
The CDC’s mold prevention guidance also recommends fixing leaks and controlling indoor humidity because ongoing moisture gives mold the conditions it needs to grow.
Our Shower Leak Repair Process

This was not a quick cosmetic repair. The shower needed a full rebuild to properly eliminate the source of the leak and prevent the same issue from returning later.
Here’s how we handled the project.
1. Controlled Demolition
We carefully removed:
- Damaged tile
- Compromised drywall
- Old backer board
- Moisture-damaged materials
The surrounding areas of the home were protected with dust barriers and floor coverings to keep the workspace controlled and clean during demolition.
2. Moisture Inspection
Once the walls were open, we inspected:
- Framing
- Subfloor
- Plumbing connections
- Insulation
We also checked moisture levels to confirm the area was fully dry before rebuilding began.
3. Surface Preparation
Before waterproofing installation, the framing and surfaces needed to be reinforced and properly prepared.
We installed cement backer board and ensured all surfaces were clean, stable, and ready for the waterproofing system.
This step is extremely important because even high-quality waterproofing products can fail if the underlying structure is weak or improperly prepared.
4. Waterproofing Installation
This is where the real protection happens.
We installed a modern waterproofing membrane system designed to create a continuous barrier behind the tile and protect the shower walls, corners, and base from future moisture penetration.
Additional waterproof sealants were applied around:
- Plumbing fixtures
- Shower corners
- Transition points
- The shower curb
The goal is to protect the shower even if grout eventually develops minor cracks years later.
5. Tile & Fixture Installation
Once the waterproofing fully cured, we installed:
- New tile
- Mold-resistant grout
- Flexible silicone joints
- Updated fixtures
Proper spacing, drainage, and sealing were all carefully checked during installation to help maximize long-term durability.
Materials We Used for Waterproofing
For this shower rebuild, we used materials selected specifically for wet-area durability and moisture protection, including:
- Cement backer board
- Waterproof membrane system
- Flexible waterproof sealant
- Mold-resistant grout
- Properly sloped shower base components
Using the correct materials is one of the biggest differences between a shower system that lasts for years and one that develops hidden leaks prematurely.
Preventing Future Shower Leaks

Even properly built showers still benefit from regular maintenance and early inspections.
Homeowners can help reduce the risk of future leaks by:
- Replacing aging caulking when needed
- Monitoring cracked grout lines
- Addressing loose tiles early
- Improving bathroom ventilation
- Watching for moisture near baseboards and corners
Proper airflow is also important in moisture-heavy bathrooms. The EPA’s mold and moisture guide recommends fixing plumbing leaks and drying moisture-damaged materials as soon as possible to reduce the risk of mold growth inside the home.
Final Result
After completing the rebuild, the shower in this Richmond Hill home was fully waterproofed, structurally reinforced, and rebuilt for long-term everyday use.
More importantly, the homeowner finally had peace of mind knowing the hidden moisture issue had been properly resolved instead of temporarily covered up.
Projects like this are a reminder that even small warning signs inside a bathroom should never be ignored. In many cases, catching the problem early can prevent much larger repairs later on.
If you are planning a larger bathroom upgrade or rebuilding an older shower system, you can also explore some of our recent custom bathroom renovation projects in the Richmond Hill area.
Frequently Asked Questions
What causes shower leaks behind tile?
In many cases, leaks happen because the waterproofing layer behind the tile has failed or was never installed properly.
Can cracked grout cause water damage?
Yes. Cracked grout can allow moisture to travel behind the tile system over time, especially in frequently used showers.
Is regrouting enough to fix a leaking shower?
Not always. If the waterproofing underneath has failed, replacing grout alone may only temporarily hide the problem.
How long does a shower leak repair usually take?
The timeline depends on the extent of the damage, but many full shower rebuilds take several days to complete properly.
Need Help With a Leaking Shower?
If you suspect hidden moisture damage, cracked waterproofing, or an active shower leak, having the area inspected early can help prevent much larger repairs later on.
At EV Construction, we help homeowners with:
- Shower leak repairs
- Waterproofing rebuilds
- Tile replacement
- Bathroom remodeling projects
- Moisture-related bathroom repairs
If you would like to discuss your bathroom project or schedule an inspection, you can contact EV Construction.